Updated
Published
Publishing apps to the OpenStore with GitLab CI
Use Clickable to automatically publish your apps to the OpenStore.

Recently UBports completed a migration of the click based core apps to GitLab. You can find them all in our GitLab organization. The reason we moved the click base apps over to GitLab was to take advantage of their awesome CI solution. With the GitLab CI we have each app building a click for each commit and each merge request. On top of this we can also easily publish new version directly to the OpenStore without needing to log into open-store.io. With this setup it allows each core app maintainer to have control over their own releases while being able to release the apps under the UBports account on the OpenStore without ever needing to login. I have also been using this setup in my own apps and have written this tutorial to help others get setup with GitLab CI and their click apps.
Table of Contents
- What you will need
- Start a new project
- Setting up the GitLab repo
- .gitlab-ci.yml
- Git workflow
- Closing
- Further Reading
What you will need
- A GitLab account
- An OpenStore account
- A click app built with Clickable (If you don’t, start with the section title “Start a new project”)
Start a new project
If you are familiar with Clickable or already have an app setup feel free to skip this section.
Once you have Clickable installed, run clickable create to start a new click project.
Clickable will then walk you through several options to get you setup. Once you have a new app created, move to the project’s root directory.
From there you can run clickable to compile, package, and install the app on your device for testing.
Once the app is ready to be published, create a new GitLab repo
for pushing your code.
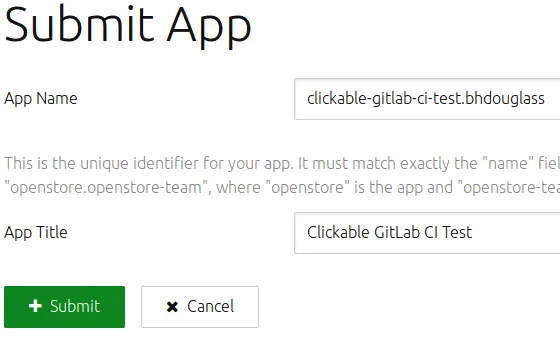
After that log into your OpenStore account and navigate to the submission page.
Enter the app’s name and title. It is very important to use the same app name as in your manifest.json or you will not be able to publish your app.
For more information, read my guide to submitting apps to the OpenStore.

Setting up the GitLab repo
In your GitLab repo you will need to setup a few things before you can publish to the OpenStore.
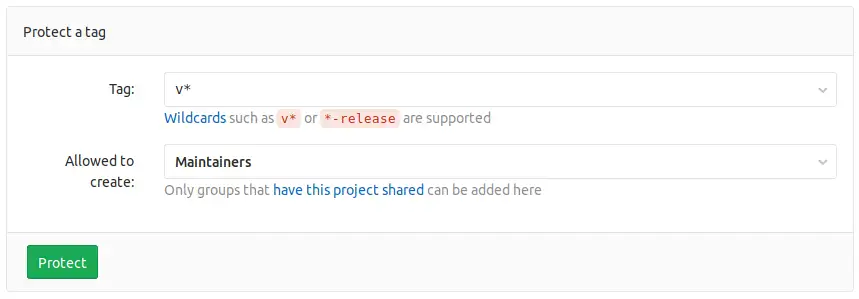
First, navigate to “Settings” > “Repository” and find the “Protected Tags” section.
Add a wildcard tag, v*, and set Maintainers as the ones allowed to create these.
This allows you to publish the app whenever a new tag starting with v is pushed (ex: v1.2.3).

Once that is done navigate to “Settings” > “CI / CD” and find the “Environment variables” section. Add the variable OPENSTORE_API_KEY,
and enter your OpenStore api key. You can find your api key on the manage apps page by
clicking the “API Key” button. It is vitally important that you toggle the “Protected” switch to ON when adding the variable.
By keeping the api key a protected variable it is only available on protected branches / tags
(And only maintainers will have access to protected tags as was previously setup).
This means that someone making a merge request to your application can not make a malicious update to your app on the OpenStore.

.gitlab-ci.yml
After the project is setup in GitLab you can add this .gitlab-ci.yml to the root directory of your app:
stages:
  - build
  - publish

build:
  stage: build
  image: clickable/ci-16.04-arm64
  rules:
  - if: $CI_COMMIT_TAG == null
  script:
    - clickable build --clean
  artifacts:
    paths:
      - build/*/app/*.click
    expire_in: 1 week

publish:
  stage: publish
  image: clickable/ci-16.04-arm64
  rules:
  - if: $CI_COMMIT_TAG
  script:
    - clickable build --clean
    - clickable publish "$CI_COMMIT_MESSAGE"
  artifacts:
    paths:
      - build/*/app/*.click
    expire_in: 1 week
What does this file do? It directs GitLab’s CI to build the app in two stages, one for releases and one for just testing.
Build
The first stage is build, which uses Clickable to build your app.
This will run any time you push commits to GitLab and for every merge request made against your project.
It will not get run when you push new tags to GitLab as they will be used for publishing new releases.
build uses the clickable/ci-16.04-arm64 Docker image, this image comes prebuilt with Clickable setup in
container mode.
As mentioned previously, this stage will not build new tags, as specified in the rules section.
The script section runs a standard Clickable build to produce a click package.
If you need to add anything more to your build script you can add additional lines here
(for example, the weather app injects an OpenWeatherMap api key from a GitLab CI variable).
Lastly the build section keeps the built click file as an artifact that GitLab will only keep for 1 week
(this can be configured by changing the expire_in value).
On the CI job page for each completed build stage you can find the click package for download and testing.
Since this also happens for every merge request it is simple to download and test a click from a merge request.
Publish
The second stage is publish, this uses Clickable’s OpenStore integration to publish new git tags as new versions in the OpenStore.
It is mostly identical to the build stage, using the same image and artifacts.
It will only run when a new git tag is pushed, as per the rules section.
And as was setup in the previous section, these tags must match the pattern v* so you can use the OpenStore api key that was setup as a CI variable.
The script part of the publish stage uses the same clean build as the build section,
but once the click file has been built it will run clickabe publish to send the new version to the OpenStore.
The argument passed to clickable publish will get added to the OpenStore changelog.
In this case the special GitLab CI variable called CI_COMMIT_MESSAGE is used. This variable will hold the value of the last commit message.
With this setup the an app can be built and published without ever needing to log into the OpenStore.

Git workflow
Now that the project is setup and the .gitlab-ci.yml configuration has been committed
you can use the following workflow to publish a new release of your app.
1) Commit changes
Once all the changes you want to make in your next version are completed you can commit them as you normally would using git commit.
2) Update the version
Next you can update the version of the app in your manifest.json file
(sometimes this file will be called manifest.json.in because it gets modified during the build process).
3) Commit version change
Commit the update to your manifest file with git commit -a.
The commit message that you write will become the changelog in the OpenStore.
Here is an example commit message:
v1.2.3
- Fixed keyboard bug #31
- Added cool new features
4) Tag version
Having completed the version update commit, the next step is to tag that commit using git tag v1.2.3, where v1.2.3 is your version number.
5) Push changes and tags
Push both your commits and the new tag to GitLab using git push && git push --tags.
Once GitLab receives the commits and tags it will start building your app and publish it to the OpenStore.

Closing
This setup can be viewed in action with any of the UBports core apps (for example: the weather app) and also in this test repository. If you have an questions or suggestions feel free to reach out to me via my website
Further Reading
- GitLab docs for .gitlab-ci.yml
- GitLab docs for CI variables
- Clickable Docs
- UBports App Development Docs
- OpenStore Badges - Link to your app on the OpenStore in style