Published
Testing and Linting a Node.js Api
Learn how to test a Node.js Api using Mocha, Chai, Sinon, SuperTest, and factory-girl.
This post is quite old, but may be still relevant to you. However, if you are looking for something more modern, check out my post about testing an Express app with the Node Test Runner.
A few weeks back I was doing some refactoring of the api code for the OpenStore. Not wanting to do a bunch of manual testing, I decided it was time to implement some testing to better ensure that restrictions around app management are working as expected. For this I decided to use the tools Mocha, Chai, Sinon, SuperTest, and factory-girl. Why these tools in particular? Mostly due to familiarity from a previous job. This approach is working for me, so I wanted to write a tutorial to help others get setup with a testing environment for their Node.js api.
The App
The OpenStore is an Express api using the Mongoose ORM. So for the purpose of this tutorial I’ll use an example app with the same technologies. But this testing setup should easily be usable with other frameworks and ORMs thanks to the generic nature of the tools involved. For this tutorial I’ll walk through setting up a new, simple api. Then we’ll add testing and linted. If you have an existing api you can skip over the setup and jump straight to implementing the testing.
Setup and install dependencies
To get started you’ll need to setup a new Node.js project with npm init. Then
install the necessary dependencies: npm install --save mongoose express body-parser.
Once the dependencies are installed, add an npm script start to call node ./index.js.
This will simplify running the code. Then you can add the following two files to the project:
index.js
const express = require('express');
const bodyParser = require('body-parser');
const Widget = require('./widget');

const app = express();
app.use(bodyParser.json());


app.get('/', async (req, res) => {
    try {
        let widgets = await Widget.find();
        res.send(widgets);
    }
    catch (err) {
        res.status(500);
        res.send();
    }
});

app.get('/:id', async (req, res) => {
    try {
        let widget = await Widget.findOne({_id: req.params.id});
        res.send(widget);
    }
    catch (err) {
        res.status(500);
        res.send();
    }
});

app.post('/', async (req, res) => {
    let widget = new Widget({
        foo: req.body.foo,
        bar: req.body.bar,
    });

    try {
        await widget.save();
        res.send(widget);
    }
    catch (err) {
        res.status(500);
        res.send();
    }
});

app.put('/:id', async (req, res) => {
    try {
        let widget = await Widget.findOne({_id: req.params.id});
        widget.foo = req.body.foo;
        widget.bar = req.body.bar;

        await widget.save();
        res.send(widget);
    }
    catch (err) {
        res.status(500);
        res.send();
    }
});

app.delete('/:id', async (req, res) => {
    try {
        let widget = await Widget.findOne({_id: req.params.id});
        await widget.remove();

        res.status(204);
        res.send();
    }
    catch (err) {
        res.status(500);
    }
});

app.server = app.listen(8080);
module.exports = app;
This sets up a very basic CRUD Express app that listens on port 8080. The last two lines expose the server so the api can be easily tested.
widget.js
const mongoose = require('mongoose');

const mongoUri = process.env.MONGODB_URI || 'mongodb://localhost:27017/test';
mongoose.connect(mongoUri, {useNewUrlParser: true}, (err) => {
    if (err) {
        console.error('database error:', err);
        process.exit(1);
    }
});

const WidgetSchema = mongoose.Schema({
    foo: String,
    bar: String,
});

module.exports = mongoose.model('Widget', WidgetSchema);
This sets up a simple Mongoose schema that gets used in index.js. It will
connect to a local MongoDB server, so make sure you have one running locally.
Or you can set the MONGODB_URI environment variable to use an Mongo server you
have access to.
Now you can run npm start and interact with the api via curl or a tool like Postman. Some curl examples:
# Get all
curl http://localhost:8080

# Get by id
curl http://localhost:8080/5caca4e450fc8a552e9c37f6

# Create widget
curl -X POST -H "Content-Type: application/json" --data '{"foo": "test", "bar": "testing"}' http://localhost:8080

# Update widget
curl -X PUT -H "Content-Type: application/json" --data '{"foo": "test2", "bar": "testing2"}' http://localhost:8080/5caca5be1e9a365729a083bb

# Delete widget
curl -X DELETE http://localhost:8080/5caca5be1e9a365729a083bbTesting the App
Now that we have an api up and running we can start writing tests for it. To do
that you will need to install several dependencies: npm install --save-dev mocha chai factory-girl sinon sinon-chai supertest.
Each of these packages has a different role to play in testing our app.
Mocha is a testing framework for JavaScript.
Chai is an assertion library that complements Mocha.
factory-girl is a factory library that makes it simple to generate test data models.
Sinon is a library for mocking, stubbing, and spying function calls for your tests.
sinon-chai is an extension to Chai that allows you to assert calls to your mocks from Sinon.
SuperTest is a library for testing http servers.
Once everything finishes installing, add a new script to your package.json called
test and have it run the mocha command. Then you can create the following files:
test/setup.js
const chai = require('chai');
const FactoryGirl = require('factory-girl');
const mongoose = require('mongoose');
const sinon = require('sinon');
const sinonChai = require('sinon-chai');

const app = require('../index');

require('./factories/widget');

FactoryGirl.factory.setAdapter(new FactoryGirl.MongooseAdapter());

chai.use(sinonChai);

before(function(done) {
    // Wait for the mongoose to connect
    if (mongoose.connection.readyState != 1) {
        mongoose.connection.once('open', done);
    }

    this.sinon = sinon;
});

afterEach(async function() {
    await FactoryGirl.factory.cleanUp();
    this.sinon.restore();
});

after(() => {
    app.server.close();
    mongoose.connection.close();
});
This setup module will integrate the various different testing tools and get everything
setup so we can start testing our api. The before function will run once before
any tests get run. This before function ensures that Mongoose is connected to
the local database (make sure you have Mongo running on your machine). The afterEach
function runs after every test has completed. It calls the cleanup/restore methods
so that FactoryGirl and Sinon are clear for the next test. Lastly, the after
function will run once after all the tests are complete and it will shutdown the
server and Mongo connection so the test process doesn’t hang when it’s done.
test/factories/widget.js
const {factory} = require('factory-girl');

const Widget = require('../../widget');

factory.define('widget', Widget, {
    foo: factory.sequence('Widget.foo', (n) => `foo${n}`),
    bar: factory.sequence('Widget.bar', (n) => `bar${n}`),
});
The widget factory simply sets up the rules for generating new widgets. These will be persisted in the database and be made available in our tests. For more information on how to setup a factory, check out this FactoryGirl tutorial.
test/api-test.js
const {expect} = require('chai');
const {factory} = require('factory-girl');
const request = require('supertest');

require('./setup');
const app = require('../index');

describe('API Test', () => {
    context('GET all', () => {
        it('is successful with multiple widgets', async () => {
            await factory.createMany('widget', 5);

            let res = await request(app).get('/').expect(200);

            expect(res.body).to.be.lengthOf(5);
        });

        it('is successful with no widgets', async () => {
            let res = await request(app).get('/').expect(200);

            expect(res.body).to.be.lengthOf(0);
        });
    });
});
Now that the setup is all out of the way, the real fun begins. This module creates
two tests (defined by the calls to it). describe and context are ways for
you to group related tests. Each group of tests can have their own before/beforEach/afterEach/after functions.
The first test creates multiple widgets via the factory that we setup earlier.
It then uses SuperTest to make a GET call to the / route that was setup in the Express app.
Naturally, we expect it to return a 200 response and contain all of the widgets
that we setup via the factory. This example is using the expect style behavior-driven
development (BDD) methods of Chai. There are several different options provided by
Chai and you can check out a comparison of them in the Chai docs.
The second test is similar to the first, except it doesn’t create any widgets via
the factory so the expected result is empty.
These first two tests covered some successful paths of the GET / route. What about
the error handling part of that route? This is where Sinon comes in. Sinon can do
many different things like spy on a method to see if it gets called. But for this
next test we will stub the Widget.find method to make it return a rejected promise
so the error handling can be tested. Add the following to the GET all context for
the api-test.js module (and also import the widget class: const Widget = require('../widget');):
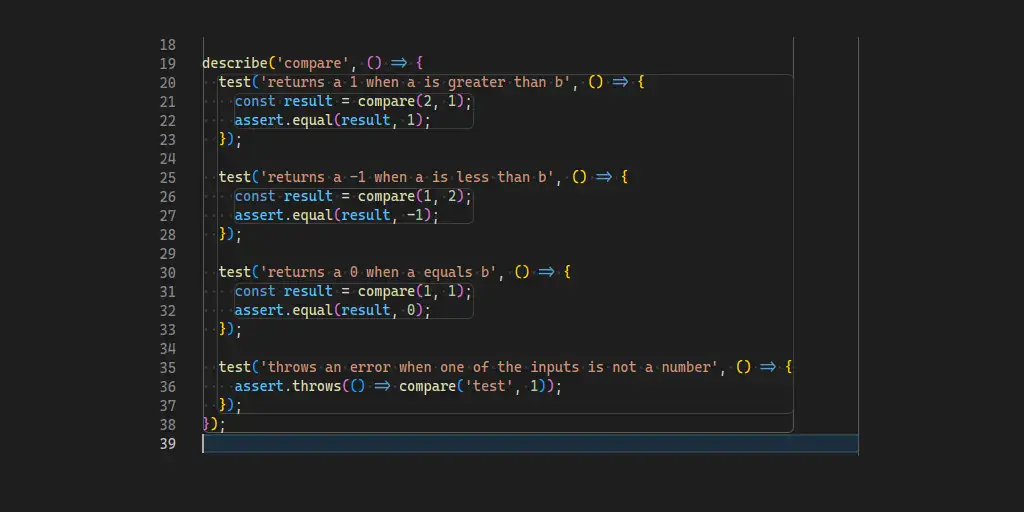
it('fails with a 500 error', async function() {
    let findStub = this.sinon.stub(Widget, 'find').rejects();

    await request(app).get('/').expect(500);

    expect(findStub).to.have.been.calledOnce;
});
Sinon replaces the Widget.find method with a stub function that returns a rejected promise.
So rather than making a call to the database this will cause the request to return a 500 error.
At the end of the test we’ll check that the stub function got called
and that the test didn’t fail for a different reason.
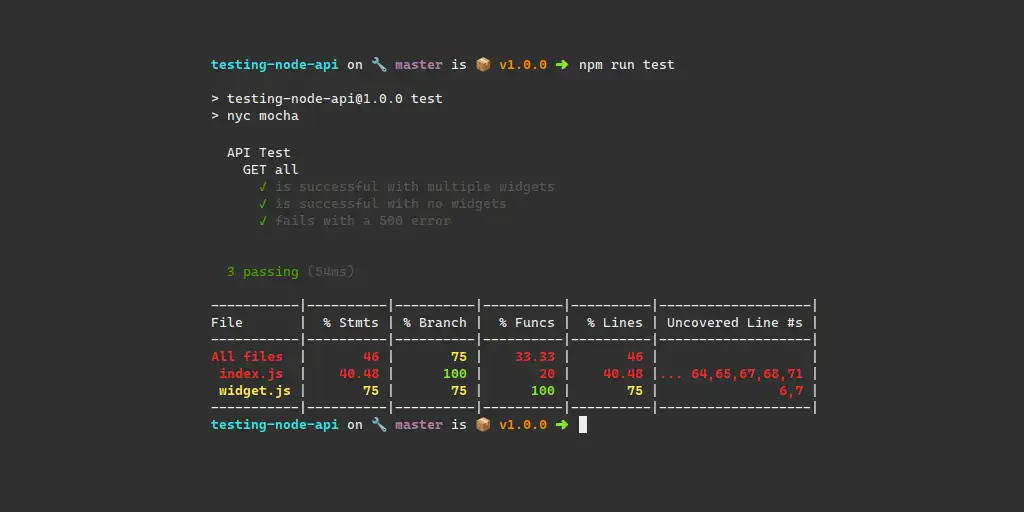
Code Coverage
Since we have a few tests setup, let’s start tracking some metrics around how much
of our code is getting tested. For this, install Istanbul’s nyc
command: npm install --save-dev nyc. In order to start using nyc, you can put
it before mocha in your test script. Alternatively you can make a new script
called coverage to call nyc npm run test. Now if you run the updated script,
you will first see the test output. Once that is completed, you’ll get a table
of source files, code coverage metrics, and uncovered lines. This can be a good
indicator of where to focus your testing efforts.
Linting the App
In addition to testing it is also good to lint your code to keep it consistent,
especially when working with other developers. ESLint is a
great tool for linting JavaScript code. Install it by running npm install --save-dev eslint.
To use ESLint it’s best to pair it with a configuration. There are two popular
configs: Airbnb and Standard.
I have my own config based on the Airbnb one, for this tutorial I’ll be using it.
Feel free to install whichever you choose. Install it and the plugin import
modules: npm install --save-dev eslint-config-bhdouglass eslint-plugin-import.
Now you can create a file .eslintrc.js, this will tell eslint how to behave.
.eslintrc.js
module.exports = {
    extends: [
        'eslint-config-bhdouglass',
    ],
    env: {
        node: true,
        mocha: true,
    },
    rules: {},
    overrides: [
        {
            files: "*-test.js",
            rules: {
                'no-unused-expressions': 'off',
            },
        },
    ],
};
This config file tells ESLint which config we want to follow, in this case
eslint-config-bhdouglass. Then we’ll need to let ESLint know that we are running a
Node environment and we are also using Mocha. This will prevent errors on our tests
for Mocha’s globals. If you want to customize the linting rules for this project
you can set them in the rules section. You can see the list of available rules in
the ESLint docs. Lastly we need to set specific
rules on our test files to prevent ESLint from giving us issues with lines like
expect(findStub).to.have.been.calledOnce;. Since the configuration is completed,
you can now add a new script to your package.json, called lint and make it call eslint.
Running npm run lint will invoke ESLint with the configured rules and it will
spit out some warning and errors as it files them.
CI Setup
After writing all those tests and hooking up linting the final thing to do for this tutorial is to make these processes run automatically in CI. To do this we’ll use the GitLab CI because its very simple to use. Create the following file in the root of your project:
.gitlab-ci.yml
services:

- mongo:latest

test:
  image: node:latest
  script:
    - npm install
    - npm run lint
    - MONGODB_URI=mongodb://mongo:27017/test npm run test
Since the tests hit the Mongo database, the first few lines are needed to setup
a Docker container running mongo. If you need a specific Mongo version you can
change it to one of the available versions.
After the service we setup the test “stage”, this will use the latest Node docker
image (as with Mongo, you can use any available version).
Now for the actual testing/linting. As part of the script, first all the necessary
dependencies need to be installed, then it will run the lint command that was setup
previously. After linting it will run the test command with an environment variable
to use the Mongo service that was configured earlier. If both linting and tests run
successfully the test stage will be successful. The only thing left to do is commit
the .gitlab-ci.yml file and push the code to GitLab.
Closing
If you want to see the complete example api with tests, linting, and CI just check out the project on GitLab. If you have an questions or suggestions feel free to reach out to me via my website or file an issue on the GitLab project.